In the last few blogs, we have covered how Kubernetes works and discussed why Kubernetes has become near ubiquitous in the world of cloud computing.
The blogs on Kubernetes architecture explored the internals of Kubernetes and made us more comfortable with it. At the same time, the blog on Kubernetes workloads and the kubectl blog made it easier for us to experiment with it. We also discuss the finer aspects of Kubernetes, like the concept of namespaces and how they are very useful in many use cases.
In this blog, we will discuss Kubernetes deployments in detail. We will cover everything you need to know to run a containerized workload on a cluster.
Kubernetes deployment – essentials
Pod and Containers
The smallest unit of a Kubernetes deployment is a pod. A pod is a collection of one or more containers. So the smallest deployment in Kubernetes would be a single pod with one container in it.
As you would know that Kubernetes is a declarative system where you describe the system you want and let Kubernetes take action to create the desired system.
Here is an example of how that description would look:
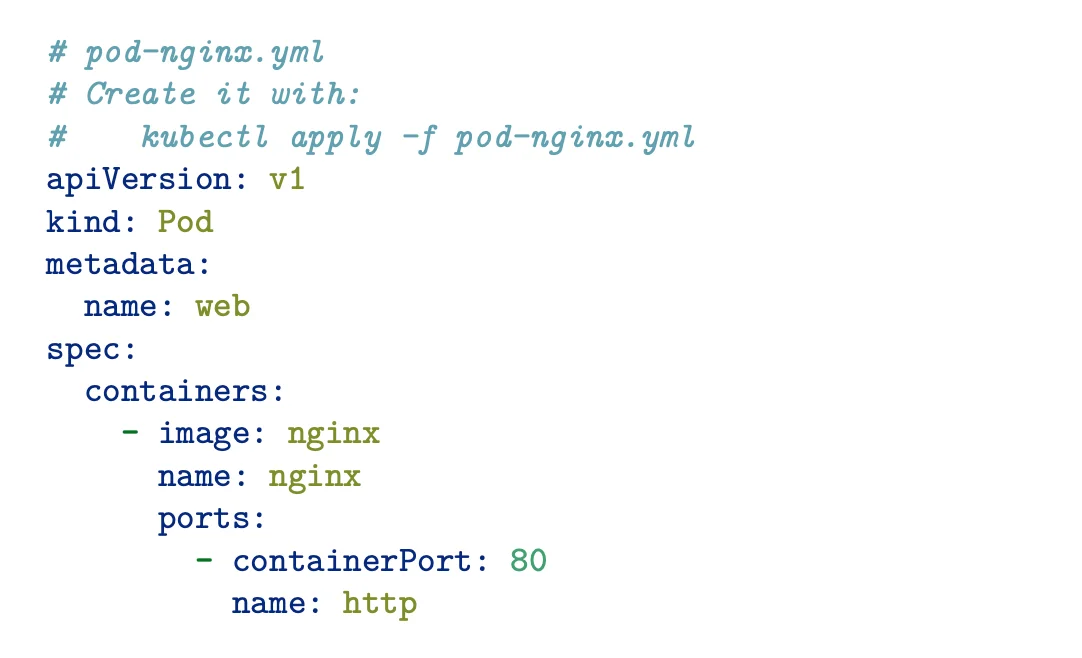
This above declaration says that we desire a system with one pod called web. The pod should have one container, which is created from an nginx image. The container must have its port 80 open and be called an HTTP port.
In order to run this application, just run the below command:
$ kubectl apply -f pod-nginx.yaml
Cluster
Multiple pods together form a cluster. A pod or a cluster can run an entire application or a part of it.
In a Kubernetes deployment, individual pods need not be managed. Once the deployment object defines the desired state, Kubernetes works to ensure that the necessary pods and resources exist in the cluster to achieve the desired state.
Kubernetes will also automatically determine which nodes in the cluster should run each pod and monitor its health. If any of the pods fail, Kubernetes will automatically restart the pod to ensure that the desired state is maintained.
ReplicaSets
If you wish to create multiple pods of the same specifications, Kubernetes uses a higher-level construct called ReplicaSets. It basically mentions the number of replicas of the pod specs that the system must have.
Here is a sample declaration of a ReplicaSet:
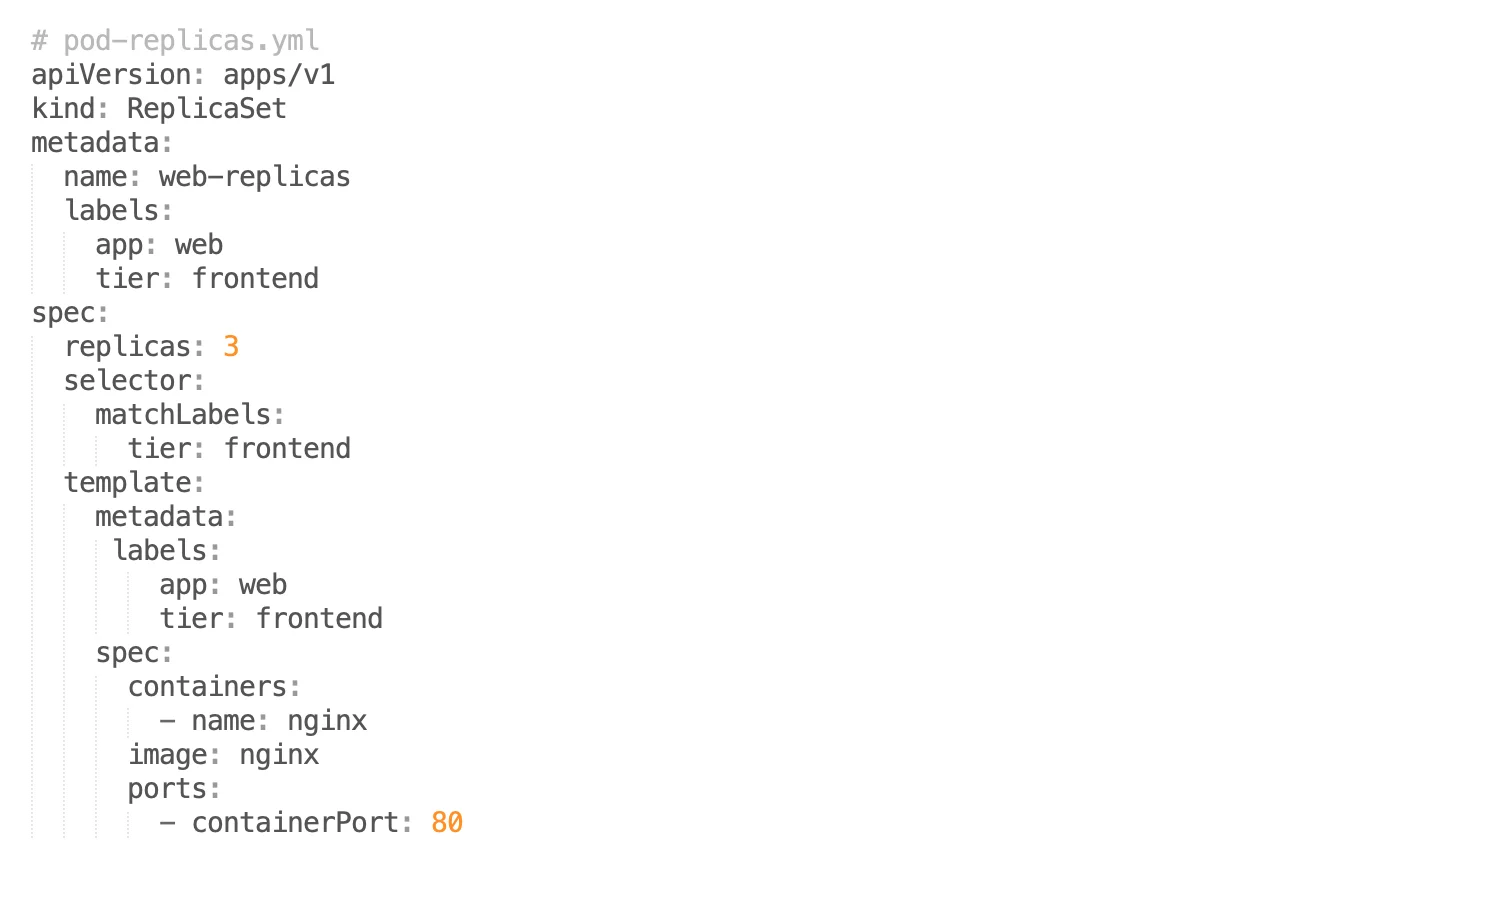
The above code describes a replica set called web, with 3 pods having the same specification as the pod we described before i.e., pods with an Nginx container.
To run this application, run the kubectl command:
$ kubectl apply -f pod-replicas.yml
Such ReplicaSets help in scaling and ensuring a high-availability setup. To scale the setup to, say, 5 pods, all we need to do is change spec.replicas value to 5. This makes scaling any deployments extremely easy.
ReplicaSets also help in ensuring the high availability of the system. In case any of the pods fail in the system, Kubernetes will automatically create new pods and smoothly transition the requests to the new pod. At all times, Kubernetes will ensure that the desired number of pods are servicing requests successfully.
Deployments
Let’s see how a Kubernetes deployment object looks in a declaration:
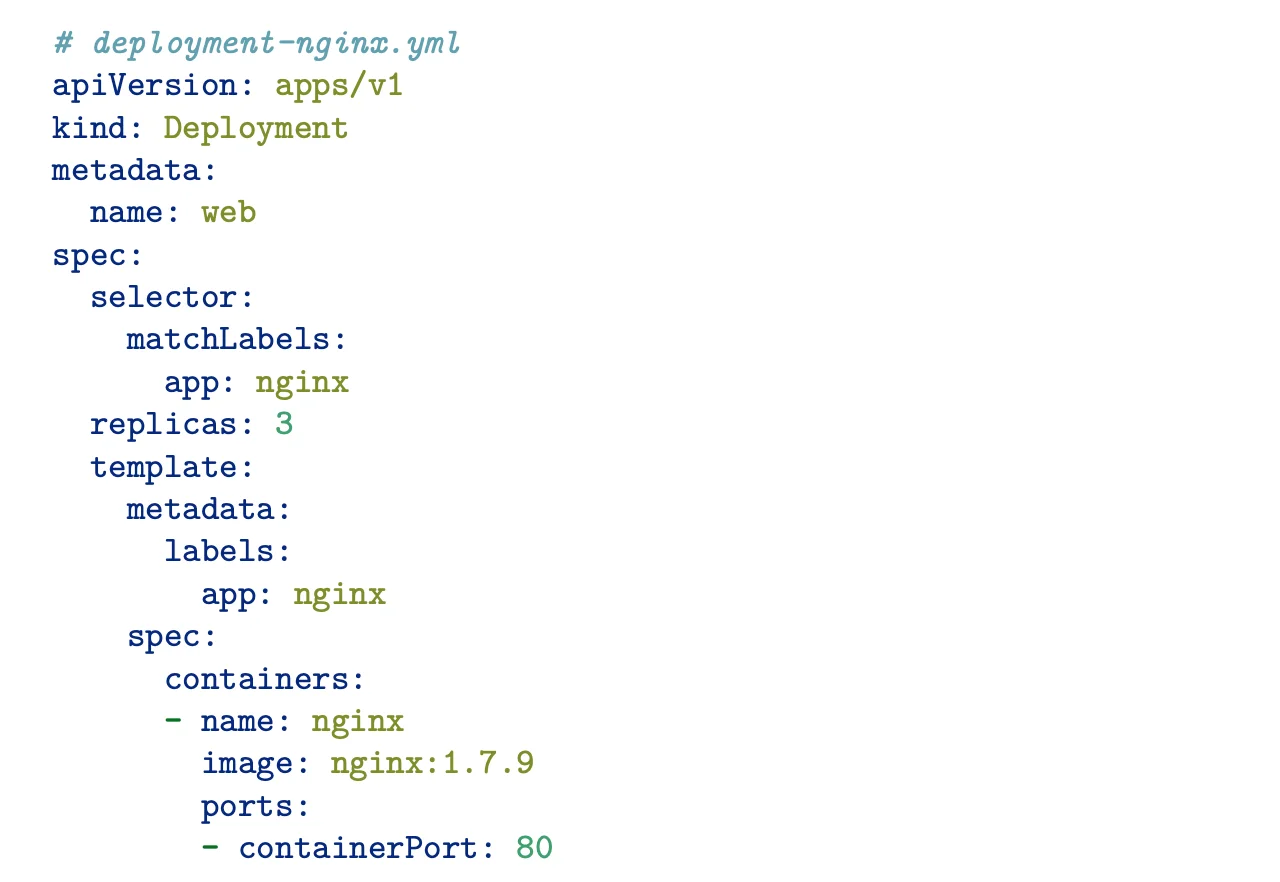
Although it looks similar, a Deployment is a higher construct than a ReplicaSet. A Kubernetes deployment does not manage pods directly. They delegate this task to one or more replica sets.
The same kubectl command can also create a deployment object in Kubernetes:
$ kubectl apply -f deployment-nginx.yml
When a new deployment like the one above is created, Kubernetes creates a replica set using the pod specification mentioned in the file. If you edit the file, Kubernetes will make the changes accordingly.
You can open the YAML file with a kubectl command as well:
$ kubectl edit deploy/web
Or change the specs via command line
$ kubectl scale –replicas=5 deploy/web
Say the image of the container is changed. The deployment will create a new replica set with the new pod specs. This new replica set will start with a size of zero, and then slowly the number of new replica sets is increased. Meanwhile, the replica set with the old pod specification is gradually reduced.
At any point, if you wish to see the progress of the scaling operation, you can run a kubectl get command as below:
$ kubectl get deploy web
Kubernetes ensures the requests to the pods (both old and new) are handled without any downtime during this transition.
To view all the deployed pods in the system, run the below command:
$ kubectl get pods
If you wish to delete a deployment, run a kubectl delete command:
$ kubectl delete deploy web
Smooth Rollback
At any time, we can launch multiple versions of the application or ask Kubernetes to roll back an update to the previous version. Kubernetes will simply progressively increase the number of “target” replica sets.
All of this is done by merely adjusting the sizes of the replica sets.
K8 Deployments v/s StatefulSets
There are however some applications where we need to manage the state of each pod. This is useful in managing stateful applications. For such use cases, Kubernetes offers a workload object called StatefulSet.
These help ensure the pods have persistent storage volumes available and have persistent network ID even when a pod is shut down or rescheduled. StatefulSet maintains a static ID for each pod. This means each pod has a separate identity. This helps maintain a persistent state across the full lifecycle of the pod.
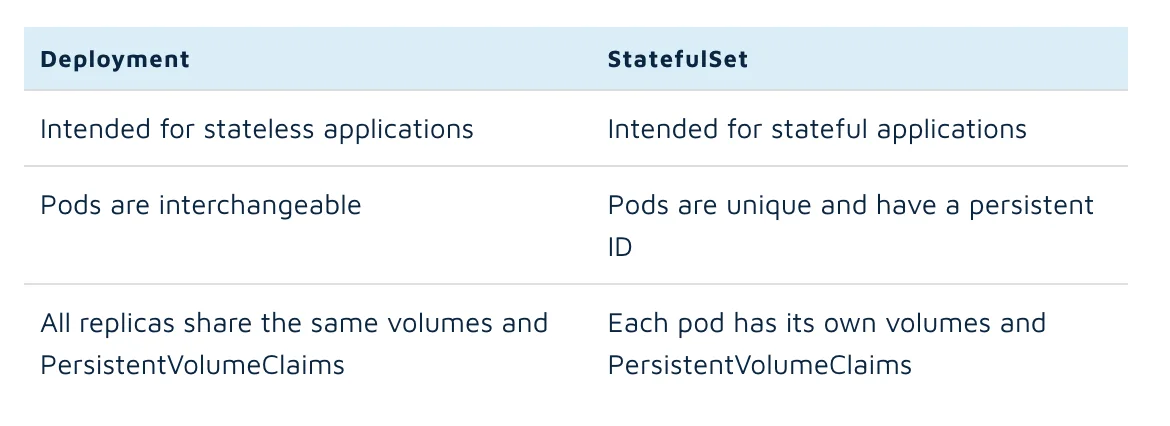
Here is a quick summary of the difference between a Deployment object and a StatefulSet object in Kubernetes:
Selectors and Labels
ReplicaSets actually work with labels of the pod and not with their specifications. These labels are basically key-value pairs that are attached to the pods. They are used to identify a type of pod.
Unlike names and UIDs, labels are not unique. Many objects in Kubernetes can carry the same label. In practice, the labels also involve a hash function of the pod’s specification. So, the labels for a pod could have key-value pairs like “run=web” and “pod-template-hash=aaaccccddddxxyy”
You can read more about labels in Kubernetes in their official documentation.
Every replica set contains a selector that is essentially a logical expression similar to a SELECT query in SQL. The replica set basically looks for the number of pods with a particular label and ensures the right number of pods exists for it.
Kubernetes Deployment Lifecycle
For any Kubernetes deployment, there are 3 stages in its lifecycle:
- Progressing
This is the stage when the deployment is currently making the changes to the system to reach its desired stage.
- Completed
This is the stage where deployment has achieved the end desired state as mentioned in the declaration file. All the pods are available and as per the desired specification. None of the pods are running in old state.
- Failed
This is the stage where the deployment has faced an issue with reconciling the current state with the desired state. This typically happens when the pods encounter errors in execution or the cluster is unable to have sufficient resources to reach the desired state.
At any point, you check the state of deployment with the below command:
$ kubectl rollout status
Popular deployment strategies
There are many deployment strategies available for Kubernetes. Here are some of the most popular ones and ones that come out of the box.
Recreate Deployment
In the recreate strategy, the current pod instances are first killed, and then new instances with the latest specifications are created. This strategy is typically used in development or testing environments where real users are not actively using the application.
Rolling Update Deployment
Rolling update deployment is the most commonly used deployment where there is a gradual transition to a new version is made. In this case, a new replica set is created with the newer version of the pods while the old version is still running. Once the new pods are started successfully, the old pods are shut down, and the incoming requests are transferred to the new pods.
One of the disadvantages of this strategy is that it takes up double the resources during the transition. At one point, there are two versions of the same application running. The other issue with this approach is that it can get difficult to roll back or interrupt the deployment if something goes wrong in between.
Advanced deployment strategies
There are also some advanced strategies that are popularly used by many cloud teams. Here are the most popular ones:
Blue-Green deployment
In a blue-green deployment, the incoming requests are instantly switched from old to the new version.
This is done by creating multiple deployments (labeled blue and green). This is switch is done by switching the selector of the service.
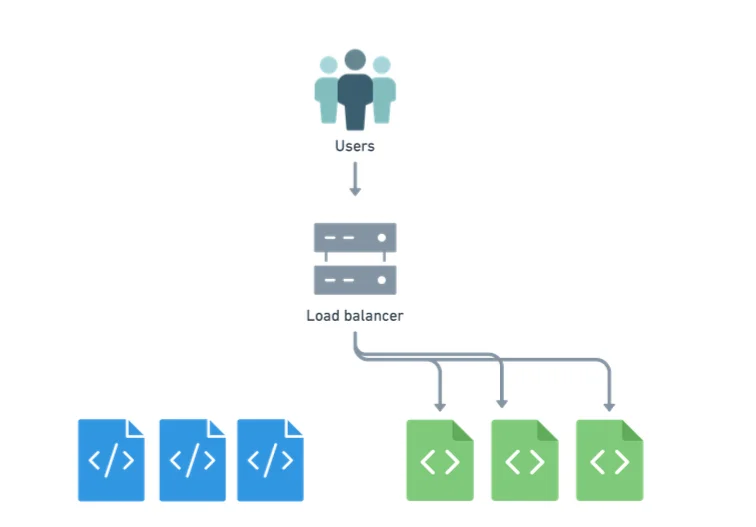
This strategy is used in situations where mixing old and new versions can cause issues in the system. This is true when the application is a part of a larger workflow. It is possible that mixing output from the old version and the new version can cause the rest of the workflow to break.
An advantage of this strategy is that it is easy to roll back the changes as both deployments are available at the time of switching. However, this also means that the infrastructure will have to hold multiple deployments at a time, which consumes a lot of resources.
Canary deployment
In a canary deployment strategy, a partial rollout of the newer version is done initially. So initially, a few replica sets of the newer version of the application is created and then a small subset of incoming requests to directed to the newer pods.
If the performance metrics of the newer version look good, then the replica sets of the newer version are gradually increased, and more traffic is routed to them.
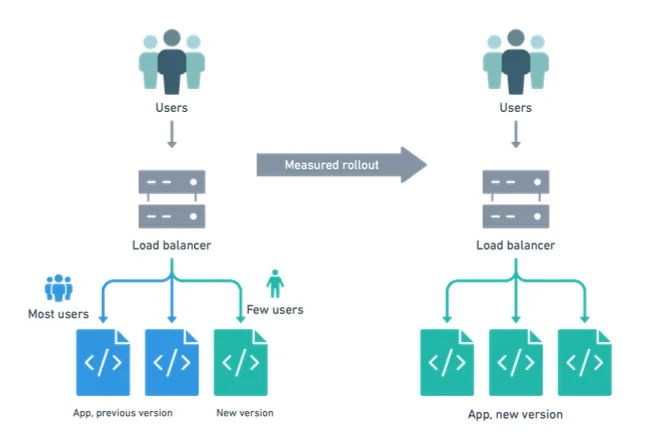
This strategy is similar to Kubernetes’ native rolling update strategy (but with greater control) and that makes it easy to implement.
Taikun – a tool for easy K8 deployments
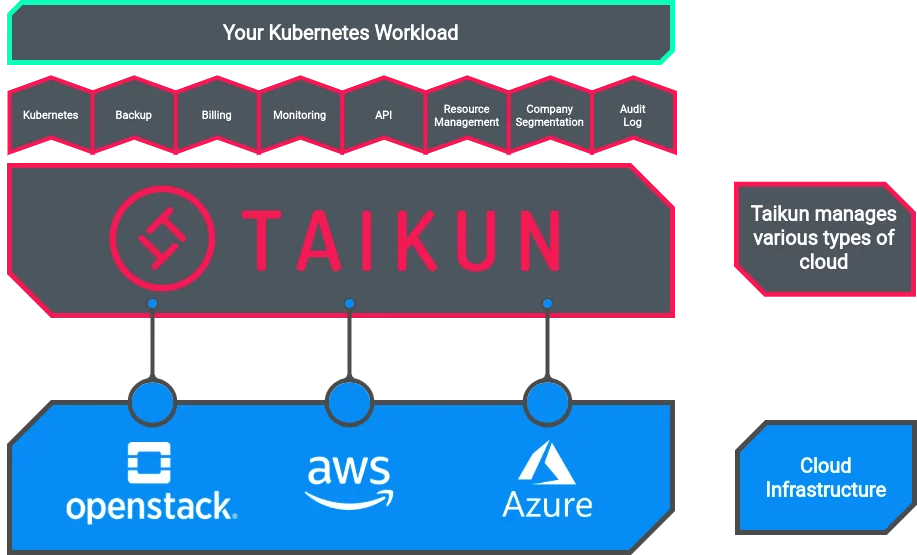
Taikun provides a comprehensive Kubernetes management and monitoring console for all kinds of cloud management tasks. It works with public, private and hybrid cloud setups. All major cloud providers are supported in Taikun (i.e. Google Cloud, AWS, Azure and OpenStack).
Taikun can help you deploy your Kubernetes clusters in a matter of a few minutes and clicks.


