Kubernetes has been a game-changer in the growth of cloud adoption in the last decade. As more containerized applications take frontstage, Kubernetes has become the go-to container orchestration tool.
In this blog, we will go into the depths of Kubernetes and study its architecture. We will also see a simple workflow on how you can set up Kubernetes and deploy it on the cloud.
If you wish to read more about Kubernetes, you can start with our series The Ultimate Guide to Getting Started With Kubernetes.
Components in a Kubernetes Architecture
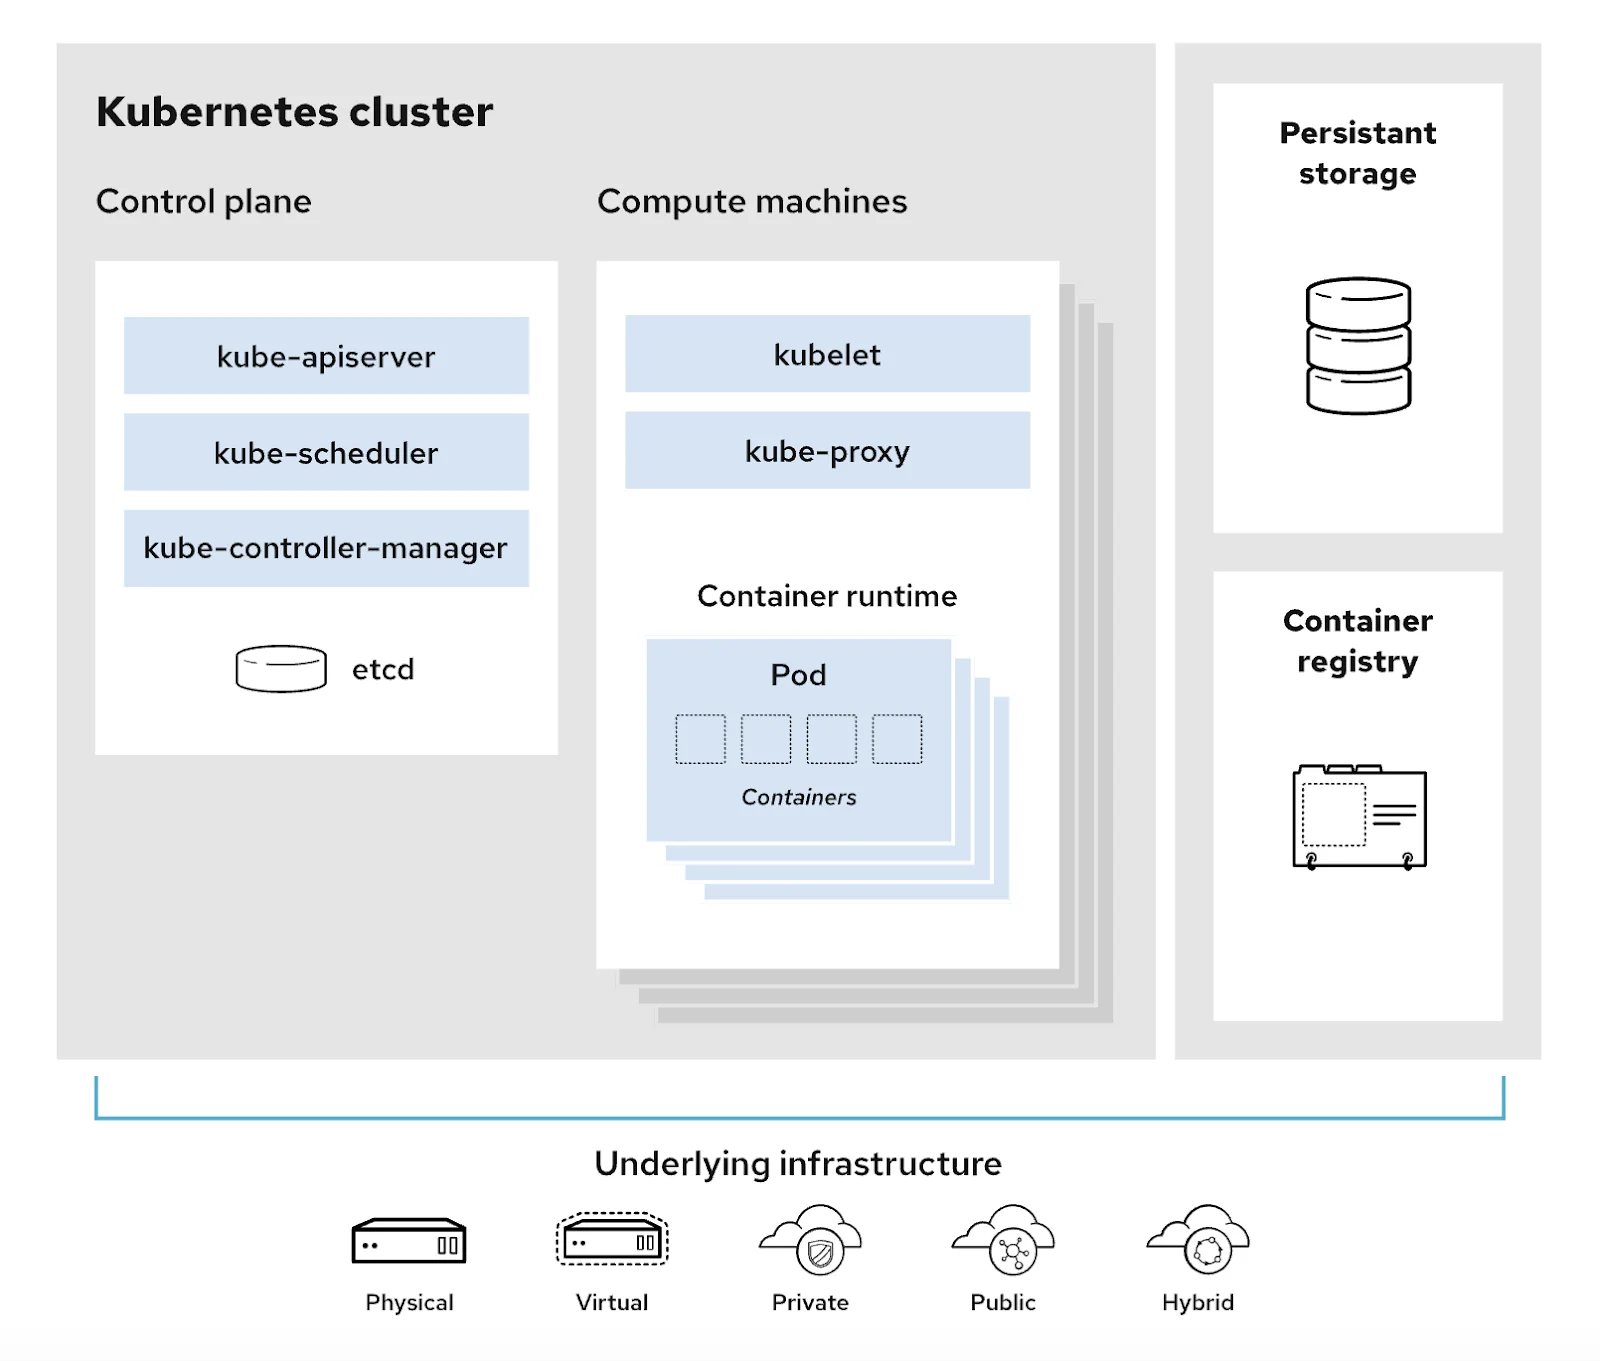
A Kubernetes cluster contains many components that help manage the containers and the application that is hosted on these containers. Let’s start with a simplified figure of the main components of a Kubernetes cluster and its supporting infrastructure.

Kubernetes needs container images to run the containers. Container registry provides those container images. All clusters are on an infrastructure which can be your machine (physical or virtual) or a cloud setup (public, private or hybrid). The clusters often also need a way to do persistent storage for the containerized applications it is hosting. These storage options outlive the life of any of the containers in the cluster.
A typical Kubernetes infrastructure will have a Control plane or a Master node that manages the entire container delpoyment in a Kubernetes cluster and many Compute machines or worker nodes that host the actual containers and execute instructions from the control plane for container orchestration.
Let’s look at each component and understand their function.
Control plane
This is the control centre for Kubernetes The Control Plane has many components that manage the cluster’s state and configuration. The data for the cluster is also saved in the control plane. The components in the control plane ensure that there are enough container resources to handle the incoming requests.
The control plane sends instructions to the compute machines or worker nodes to maintain the container infrastructure in a certain way. Here are some of the most important components of the control plane.
kube-apiserver
The API server is the front end of the control plane. All communication between the control plane and other components of the cluster happen via the kube-apiserver.
The server validates all internal and external requests and then processes it. It is also accessible via REST API calls. You can use command-line tools like kubectl and kubeadm to communicate with the kube-apiserver.
kube-scheduler
This component checks for the health of the cluster and identifies the resource needs of the system. The scheduler assigns new containers to the nodes when needed. It also determines which nodes are best fit for the new containers (actually “pods”, but we’ll talk about that in some time). It analyses the resource availability (CPU, memory etc.) of the nodes and ensures new containers are assigned to the right nodes.
kube-controller-manager
A controller manager is the one that coordinates between all other components of the control plane. There are many controller functions in the controller-manager. Each one take care different functionalities in the cluster. For eg. one controller would handle API access token, other would talk to scheduler to gather information on containers.
etcd
etcd is a key-value store database that is responsible for storing the configuration data and information about the state of the cluster. The database is distributed to ensure the system remains fault tolerance.
The entire control plane considers data in etcd as the ultimate source of truth and aligns itself with the stored configuration.
Compute machines/Worker node
Pods
Kubernetes doesn’t directly handle containers. It handles pods. A pod is the smallest unit in Kubernetes. It is basically a collection of one or more containers that are tightly coupled and work together for the same purpose. When we say, Kubernetes is managing containers, it is actually managing pods which is the name for a bunch of containers.
Container runtime engine
The containers in each node is run by a container runtime engine in the respective node. Docker is one of the most popular container tools. You can read more about containers in our series The Complete Guide on How To Get Started With Containers.
kubelet
A kubelet is the component that communicates with the control plane and executes the instructions in the worker node.
The kubelet is the primary “node agent”. It gets a PodSpec which is a JSON or YAML file that describes the pods in the node. kubelet then executes the actions to reach the desired state for the pods.
kube-proxy
This component provides networking services to the node. It handles all network communication of the node within and outside the cluster. Kube-proxy can forward the traffic itself or use the OS packet filtering layer to connect the pods to the network.
Other Kubernetes concepts
There are a few more concepts that are necessary to understand the inner workings of Kubernetes. As we discussed earlier, a pod is a collection of one or more containers that serves the same application.
However, Kubernetes creates and destroys pods as and when required. ReplicaSets are defined in the specs to set the number of replicas a pod can have to process incoming requests.
So, pods are not persistent in a Kubernetes infrastructure. To communicate, kubernetes defines a logical set of pods as a service. The service can be directly addressed and communicated with. The outside world need not worry about which pod in the service is responding to the request.
A volume is a space that gets mounted on all containers in a pod. The volume is not persistent but continues to exist for the life of the pod.
A namespace is a way to isolate a group of resources in a cluster. Each resource within a namespace must be unique and should not be able to access resources in another namespace. A namespace is very useful in limiting the amount of resources a virtual cluster can use.
A deployment is the desired state of a pod in a Kubernetes cluster. It is written as a YAML file. The deployment controller then gradually updates the node to take it to the desired state mentioned in the deployment file.
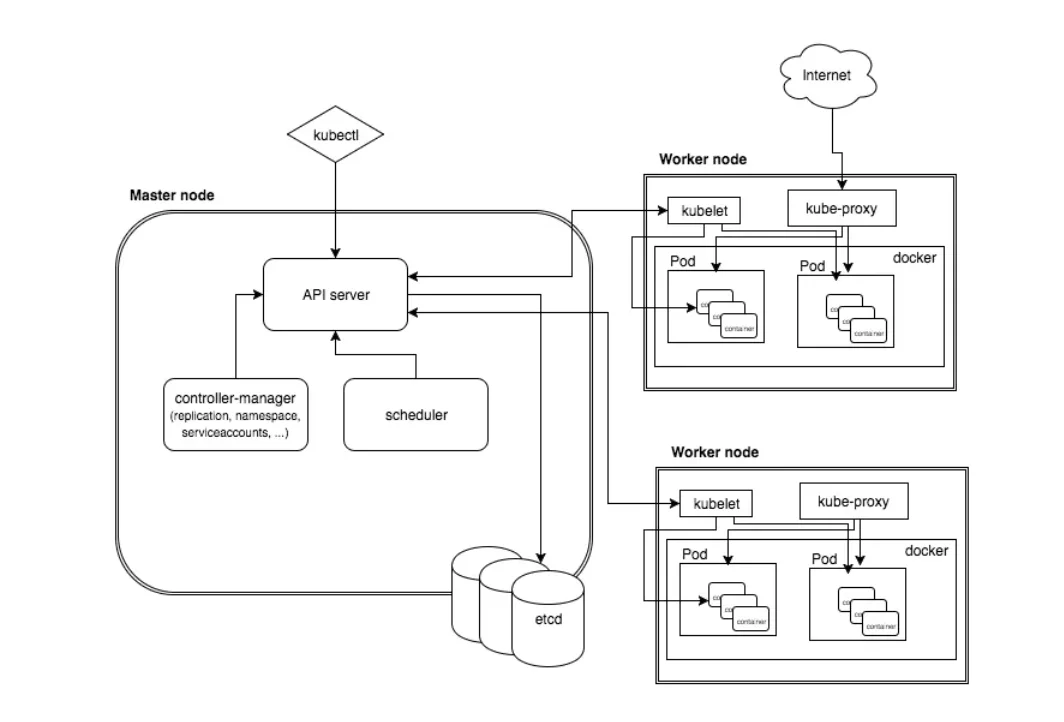
With all the above understanding of Kubernetes architecture, the below flow will now be easier to comprehend.

Kubernetes deployment from scratch
Let us now try to setup Kubernetes from scratch on your local machine to understand the architecture even better. You can also try an interactive, in-browser tutorial on the kubernetes website.
Ensure Docker is setup
In our case we will do this using minikube. Minikube is a local Kubernetes version. First, ensure you have Docker installed on your local system. You can check our blogs on Docker to learn how to install and run docker in your machine.
Install minikube
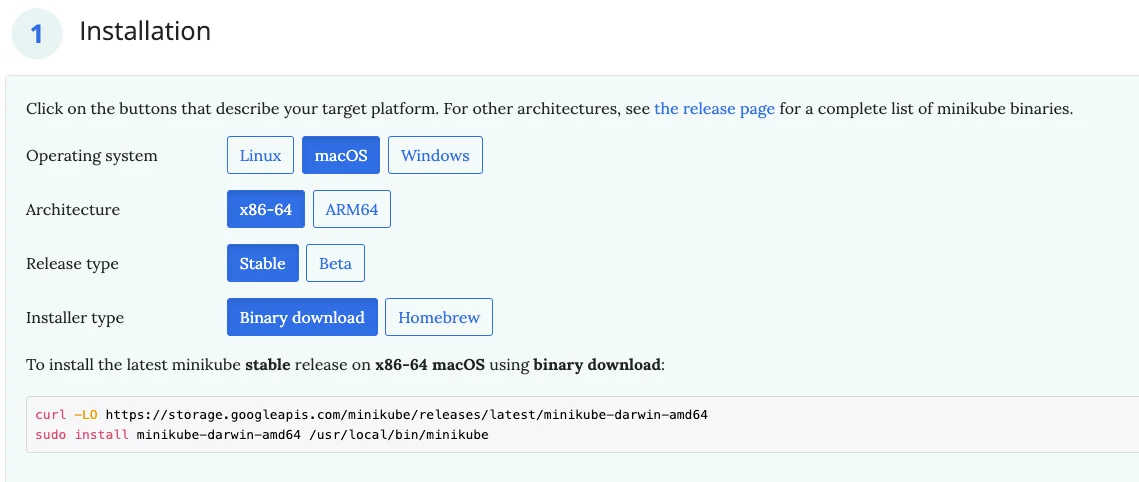
Once you have docker installed, go to minikube official site to install minikube on your system. Choose your machine type to get the exact command you need to run to install minikube.

Kubectl setup and start minikube
Next install kubectl if it is not already installed from Kubernetes website. Start minikube with the below command:
$ minikube start
Sample Nginx deployment
Create an nignx deployment and expose port 80 of the deployment with the below commands:

Confirm your deployment by checking the service:

Forward the port of deployment to 7080 and open up http://localhost:7080 on your web browser. You should see the nginx default page.

That’s it! You now have a running nginx web server on a local Kubernetes cluster.
Managing your cluster
To pause and unpause Kubernetes without impacting deployed applications, run the below minikube commands:
$ minikube pause/unpause
To stop the cluster, run the minikube stop command:
$ minikube stop
To delete all minikube clusters, run a delete command as follows:
$ minikube delete –all
This is how you can set up your own Kubernetes cluster from scratch and manage it. If you wish to learn more about how to do the same on a cloud, you can read the Kubernetes official docs and try their tutorials.
Taikun – Your Kubernetes Engineer
Understanding Kubernetes architecture definitely helps you in working with it better but running a kubernetes setup is still complex. It requires a team of highly technical resources to run and manage a kubernetes setup on cloud.
What if there was a tool that abstracts all the complexity of Kubernetes while giving you all the power to manage one efficiently?
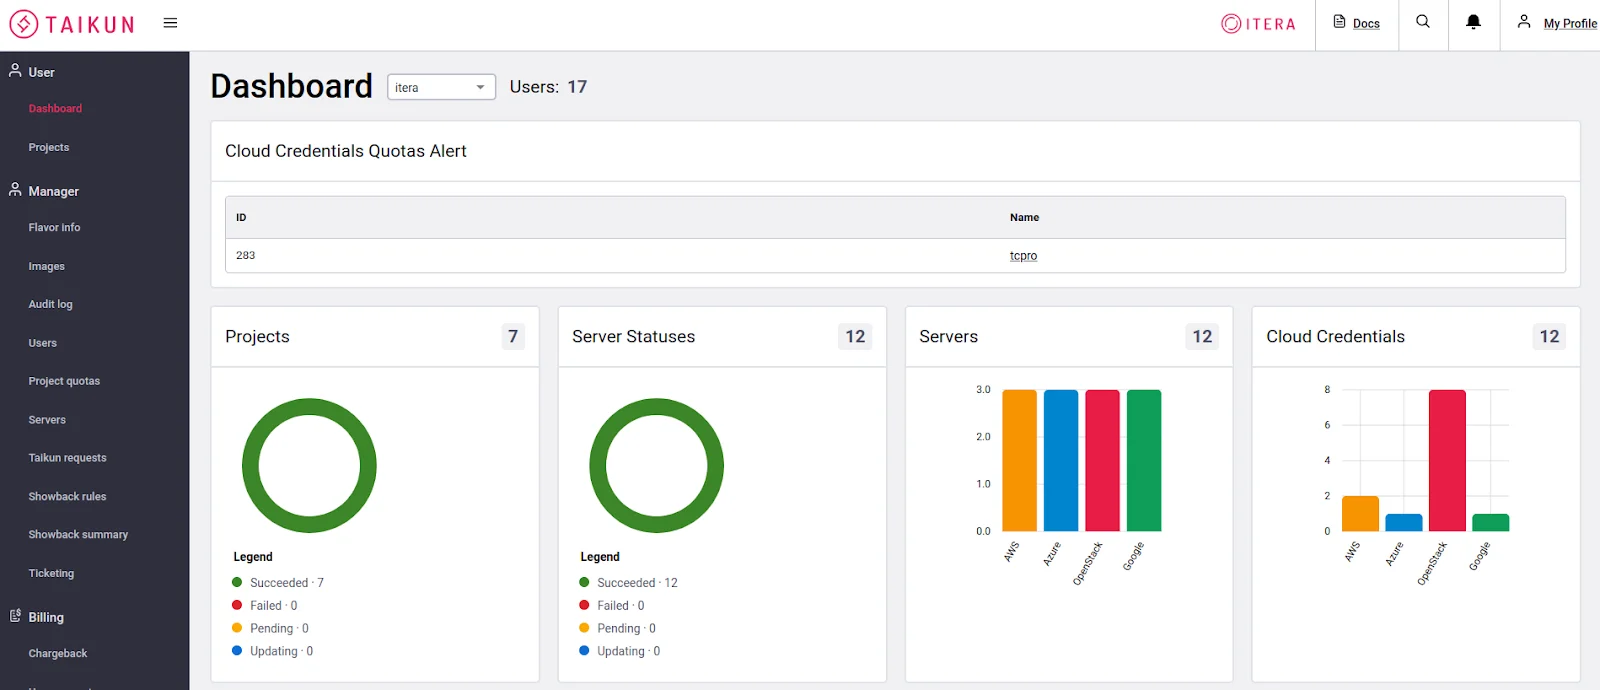
Taikun is the answer to your Kubernetes woes. Taikun provides a fairly intuitive dashboard that allows you to monitor and manage your Kubernetes infrastructure across multiple cloud platforms – private, public, or hybrid.
Taikun works with AWS, Azure, Google Cloud, and OpenShift. It helps teams get up to speed with managing complex cloud infrastructures without worrying about how the internals work.
Here’s a screenshot of the powerful, intuitive Taikun dashboard.

You can try it for FREE or ask for a custom demo of our SaaS platform


